2013-11-11

All my tech support genius

I have said it time and again, only slightly tongue-in-cheek, that all of my most appreciated 'genius' moves are attributed to these simple secrets:

There ya go... hope I haven't done myself out of any jobs by giving it all away like this.

You'll find this mug on my desk and t-shirt in my closet... I don't use a mousepad, but, I should get some of these for gifts. Lol. http://www.zazzle.com/missdorkness


2013-11-06

Uni: The end of the story

I said at the end of my reflection article 'Was completing my bachelor's degree worth it?', that my educational story wasn't over, due to the fact that I hadn't yet completed the last step in evaluating the worth of my education, which was getting a new job.

Well, it finally happened. After years of searching, I finally found a perfect fit.

I haven't mentioned my previous employer, Barnes-Jewish Hospital's Facilities Engineering Department by name often. Initially, because their social media policy prohibited naming the workplace, then, when they revised their policy, I still opted for the continued clarity of posting as me, without needing the constant disclaimers that I was not speaking on behalf of that organization.

I can't say enough good things about what a good company they were to work for. My Manager treated his people well, as did his boss, the Director. We worked independently, and as a team, and I always felt respected within our internal workgroup.
I do make that distinction, because I've had more than a few run-ins over the years and have told funny stories about them whenever I have an opening. Like the guys who asked me to make copies for them, or the one who wanted me to get him a cup of coffee (if I'm standing, I'll offer one, but, if we're all seated and you pick out the one female in the room for that request, you might want to examine your motives, or expand your knowledge of the team with which you're meeting), or the time that I retrieved the impossibly obscure bit of information that no one else would've been able to understand the context of, and some dork tried to give me a $2 tip (yeah, I laughed in his face, handed it back, and told him that my taste runs more toward good scotch than natty light). The ones who tried to give me lectures on how AutoCAD or Revit works (snrk), the ones who asked why a secretary couldn't cover for me when I was out, etc, etc, etc. So, if you've heard me tell these stories, or others, know that they did not come from the Engineers that I worked with. They respected my brain and my experience and my specialized training adequately.

It was a challenge, in my last months, trying to record important things that I'd internalized over the space of the 13 1/2 years that I worked on the engineering staff, as I wanted to leave the place much better than I found it. That was undoubted, as I put in place CAD and BIM standards (and a framework for space standards, once those are needed) and an organized file system, with viewing and plotting stations for the maintenance staff. But, all of the little tips about which firms will try to get away with substandard deliverables, or who will wait until the project is about to begin to ask about existing conditions, etc, and how to handle those effectively... that's invaluable information. Also, my framework and plans and end goal for the BIM implementation, which was only 10% complete. I can but trust that they'll replace me with someone as passionate about being good stewards of the company's long-term resources as they are.

Whew.

It was hard to say goodbye. I grew up there, I learned everything I know.
It was way past time for me to move on to something else, though.

I've since started working in the Facilities department of a financial services company (and, as with my previous employer, I will not be naming them here unless I really need to, as with their social media policy, I want to be clear that I speak from my own experiences and opinions, and am not a spokesperson for my or department). Not as a CAD Manager, but, as a System Administrator for Archibus. Yes, this job did require a Bachelor's Degree.

That is the point of this article. To say, my educational story can now be marked complete, due to this fact.

Even if I hadn't gotten a job that required a 4 year degree, I would still be grateful that I had the experience. The general education courses provided insights and a critical view that I would not have gained through purely technical learning.

Oh, and, although the degree was required, and I had to get past HR screenings and numerous interviews, I was informed of the job and given a good word by a friend in the industry. Because, as we all know, most jobs are found through personal connections, not cold calls. 

Okay, that's enough navel-gazing for now. Back to your regularly scheduled reading
(speaking of reading, have you been catching AUGIWorld Magazine? I've had a new feature in there the past few months, it's called String Theory and is about forums tips and tricks and highlighting good topics from the AUGI membership, very fun. I'll put some links on my content page when I have the time.).

2013-11-02

Revit + 3dsMax: Utilizing Render Techniques - A Winning Combination


It's been too long since I've had a guest post, so, I'd like for you to enjoy this rendering tutorial. I met Ryan on www.forums.augi.com when I was admiring his hospital renderings in the Gallery forums. Working on the Engineering side of the medical field, I don't know how to make pretty visualizations, but, I certainly recognized the photorealism and technical detail in the images he posted because they looked just like our OR's and patient rooms.

Please enjoy! 


Article by Ryan Baker Cameron, AIA, LEED AP, EDAC, NCARB
      @rbcameron1            ryan@ryanbakercameron.com           LinkedIN

Often times I hear that firms do not have the time to adequately perform high end visualization. 
Sometimes the excuses are different, Revit takes too long to render, we don't have enough detailed equipment, our staff isn't trained to perform this task or our client just isn't asking for it.
So what can we do as architects and engineers to improve the efficiency of creating visual acuity from our data models to aid in the development of future projects?  For the most part it relies heavily on the user's ability to go the next level.  In this article I will describe a quick process one takes to go from Revit then 3dsMax for faster and more accurate rendering without taking massive computing resources from your stable Revit work environment. 
In this demonstration I will use the 2013 versions of Revit and 3dsMax without the workflow manager suite installed.  While it is not necessary to have the BDS (Building Design Suite), it does require use of two sophisticated software’s, 3dsMax Design and Revit Architecture (*MEP, *Structure).  That being said, do not let the thought of having to learn 3dsMax become overwhelming.  We will be tip-toeing around 3dsMax's rendering settings, adding a camera plus lighting system and hitting the render button.  All of which are reasonably similar to Revit.  For instance, to place a camera in 3ds in any view, click on "Create"-"Camera"-"Free Camera" and click anywhere on the modeling screen.  Makes sense right?
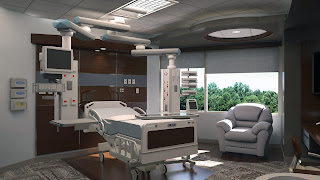
This lesson will demonstrate suggestions and techniques to get these results (below) from your Revit model without the cloud and without rendering in Revit:


Step 1:
Content is King.  Before you even begin the unspoken rule is that content is king. If you don’t have objects to put in the scene, you just have the room. The realism from a rendering isn't always having the right camera angle, or proper lighting: it is the "look and feel" of the room and how content is managed.  Including that little extra step like adding your MEP consultant's electrical outlets can sometimes make the difference.  The big idea behind "Content is King" is to model everything you would expect to see in the room.  If your firm doesn't have the resources to pay its employees ($110/hr) to create families to your company standards, it can be quite affordable to hire that out, or Google search just a little harder.  Personally I create almost all of my own equipment and post it online on a fee based download website called Turbo Squid.  (Sorry, no link as I'm not blogging to sell).  This is how I started, by paying a few bucks for a handful of Revit models created by experts; I was able to "reverse engineer" some of the processes to create high-end data-rich Revit families.


Step 2:
Materials baby, yeah!  Although you might think materials belong in the first category; materials shape the environment in a much different way than objects alone.  Really getting into Revit's custom library option is a huge benefit I don't think a lot of firms are aware of or taking full advantage of.  My only issue is that custom texture maps are not easily transferable to consultants and clients.  Meaning, if I have a texture on my server and I send my model over to my consultant (without material files) and they open the model and try to render, they will receive an error stating they don't have TextureXYZ.jpg and so forth.  So be aware that it is beneficial to utilize whatever options Revit has for materials since they are file-folder location based.  (Ex: SketchUp is model location based, meaning once the material's texture map is in the model, it creates a swatch that auto-embeds into the file without having to stay connected to the original location of the file.)  Below are a few examples of custom maps I have in this ICU Revit model.


Step 3:
Super Models are hot.  Now that you've created this fantastic mega-model, what's next hot-shot? This is generally the easiest step because you are building the model in Revit already.  Once you're done locating your equipment, walls, ceilings, lights, etc. in Revit, add your camera view and get the general feel for the room to be as exact as you want it.  Once this is ready, save the file with everything in the 3D View turned on (that you need turned on) and I find it helps to temporarily close out of the Revit model when you reach the import/export point.  (And yes, it does work if you load the central model instead of your local)

Step 4:
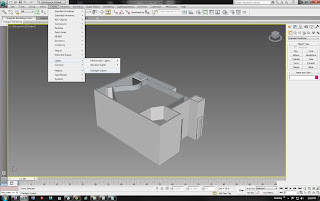
Link me up, before you go go.  Ready for the big show?  Technically while you aren't importing into 3dsMax, you are linking, which is sort of like Xref's back in CAD.  Only a few key things to look out for here.  Click the 3dsMax Logo (top left corner) then "References" - "Manage Links".  Locate the Revit file you plan on linking and once you've done that, you should get a screen asking you to select a 3D view.  I usually choose Default {3D}, but that's just me.  Next I select from the pull-down menu - "Do NOT combine objects".  Now I attach the file.  Notice a window pops up and I uncheck the boxes for Daylight and Cameras.  However, for some reason, they come in the model anyway.  I will always immediately delete the daylight and Revit cameras.  (Although it helps to keep the Revit cameras sometimes!)  I will immediately create a new Daylight system by simply clicking "Create" (up at the top) - "Lights" - "Daylight System".  A message pops up and I just click yes.  To place the Daylight System, click anywhere in the scene and click again to size the compass (it doesn't have to be huge) and then move my cursor around until I get the "Sun" in the sky and out of the way.  (It is a little tricky)


Step 5:
Light the way.  Now that you have a standard daylight system in the model, the next thing to do is literally turn on the lights.  What's great about Max is that it will read whatever data your lights were set to in your Revit model.  So if they are 1080 Lumens at 3200 K, that might be really dim with an orange-red glow.  Click on the light you want to turn on and head over to the modify tab in the properties panel.  In the below image, the 5" clear specular downlight is selected.  By checking "On" this will turn on every single 5" clear specular downlight from the linked Revit model.  The same goes for the other lights when you turn them on, as well as their individual settings, such as the lumens and kelvin temperature.

Step 6:
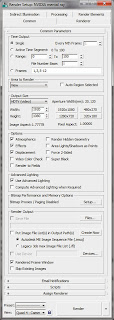
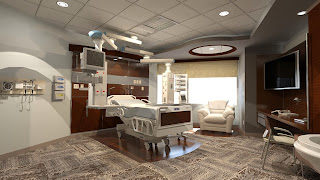
Render me this, render me that?  Basically in a nutshell you are done.  You've got your camera view selected, lights are on, Revit materials are mapped.  Hit F10 on your keyboard to view your render output settings as well as "8" on your keyboard for the environment settings.  For the environment on INTERIORS, I usually recommend starting at 10.5 for the exposure value.  The other settings, while important, can be ignored for your first test render.  For the render output settings, I will change the default custom resolution to HD and 1920 x 1080 output, under the "Common" tab. The "Indirect Illumination" tab settings will temporarily be changed to a Medium Final Gather, with Global Illumination enabled and a Diffuse Bounce value of 3.  (see images for exact settings)  The final image is what I call the test render (1st image is always a test) to see our starting place.  It took about 19 minutes and 34 seconds - All interior and exterior lights were on at 1080p HD resolution at 300dpi.  Clearly something Revit would not be able to do in such a short amount of time.


BONUS ROUND:
 
Mini-tip:  Didn't I say in the first paragraph that I would render without taking up massive computing resources once the render has started?  Well in the below image, this is how.  Open Windows Task Manager and under the processes tab, right click on 3dsMax.exe, then choose "Affinity".  This opens the CPU's processor allocation.  I will turn off CPU "0" so that Revit has enough juice (one core) to power itself uninterrupted while 3dsMax does what is does best.  As long as you don't turn off all the processors, 3dsMax will continue to operate.
Wait, can you do this to Revit while it renders?  Why, yes, you can.  However, Revit renders through a program called fbxooprender.exe, so right click on that instead of Revit.exe.  Same process by right click and setting the affinity to use a particular set of processors.

2013-09-11

"CAD" Standards Update

In 2002, I created my facility's first CAD standards manual. It was a basic checklist, outlining the most important components of drawing quality and document turnover. Clear layer names, no random Z elevations, ANSI paper sizes, well-labeled pipes, sufficient information in the titleblocks, no zip files spanned across floppy disks, etc. Short and sweet.

I have made a few adjustments over the years, as topics have come up and technology changed. The most recent change was in 2009, when our 'corporate overlords' had dictated the official start of 100% BIM. I added a one-page addenda at that point, specifying RVT and collaboration and called it a day (I've got some earlier posts, linking to other BIM standards documents), since I was sure we would not get 100% BIM all at once and I wouldn't know what did and did not work for us, until we'd used some models for the maintenance phase of a project... or ten.

So, for the past few months, I have been updating and expanding the manual (a section of the Engineering Standards and Specifications), which has turned into far more of a procedures manual, than the quality checklist it used to be.

From 2003-2008, we (ok, I) added space numbers across the campus (which previously only had numbers on patient rooms and doctor's suites), and, it has been a challenge to get the PMs to tell the architects to give me prelim plans to number before they passed them off to the engineering firms. Which, typically, hasn't happened at convenient times for me. So, I've documented the numbering procedure, so the archie firms can do it themselves, without my assistance, and further dictated the collaboration during projects (which, apparently, only happens when we force the issue).

Crazily enough, the bosses have realized that including O&Ms in my plan/model archives would be a good thing, so, I've gotten to add that procedure, too.

And, with the greater adoption of models, and the upgrade of our CMMS, we've included the Business and Operations Managers in this process, so, they can refine the automation of transferring equipment data from completed projects into our equipment database.

It has been a grueling process, with some small pain as I ruthlessly chop away at the document which I spent so much time and effort creating from scratch in my youth, but, I'm finally finished.

I write this primarily to reminisce on how much my role as a facilities "cad manager" has morphed over the years, with the changes in technology. 

On top of that, I'm also quite excited to be on the upfront side of a MAJOR campus overhaul. I was hired at the (rather disappointing) end of our last one, so, I've been a bit of a bulldog with the project team, hoping to avoid the mistakes and oversights of the past (which the current team is being hampered by... as have we, since the buildings became operational.).

When was the last time you FULLY reviewed your standards and/or operations manuals?

2013-07-29

Free Facilities Management FM class handouts

Did you know that Autodesk University and the Revit Technology Conference partner with AUGI to hold old course handouts and presentations?

Well, now you do. They're hosted in the forums, so, if you're searching for a topic, these tutorials and lectures can also show up in results. Covering AutoCAD, DWF, collaboration, information management, BIM, IPD, Revit etc.

I compiled a list of those classes that are applicable to the owner's side.

http://forums.augi.com/showthread.php?149593-FM-Class-handouts-from-AU

Obviously some of the software-based courses (like FMDesktop rip) are out of date, but, some of the concepts are still valuable, like this one:

FM104-1: Using Autodesk® FMDesktop for Space Management on a Shoestring Budget
Instructor: James E. (Jimmy) Niles
Class Description: This class will introduce the process and procedures to implement a space management system on a limited budget. We will explore the use of Autodesk FMDesktop to track departments, research grants, employees, room use, and more, for any size organization (whether it is 10,000 or 10 million square feet). We will also discuss how to make information readily available over the intranet or Internet by using third-party off-the-shelf products.

Class handouts will continue to be uploaded as they become available, so be sure to check back. I'll update that thread in the Facilities Management - In Practice forum as I see them, but, of course, I always encourage CAFM/CMMS folks to check out the CAD Management and Programming classes, too. When you're making changes on a large scale across your campus, you'll want to brush up on the automation available to speed that process up.

2013-06-28

Your Headshot - How-to

In Wednesday's post, I gave you a list of DON'Ts for your LinkedIn profile photo, and today, I'll walk you through how I created my last two headshots.

I'll admit, I waited way too long to replace my photo, but, I take horrible pictures. I just never look good in them. But, please, don't let procrastination and a fragile ego prevent you from making the effort to improve your professional image online.

Here is my last headshot:


Don't recognize it? 

How about now?
I did not have the funds at the time to even spring for lamps or good bulbs, so, my choice was between having horrible lighting in my 100 year old apartment, yucky fluorescent lighting in the office (like you saw in my even older headshot in Wednesday's post) or taking my photo outside.
I was crouched down because I didn't have a tripod and had to rest my camera on the windowsill.
Of course, none of that really matters, because it doesn't show in the final image.

Lighting

The above shot was taken outside in evening light. Morning and evening light are the best for flattering photos, because they come in at an angle and aren't as bright and harsh as sunlight in the middle of the day.

My current headshot was taken indoors, late at night, so I had to try something different. I took the table lamps from my son's room and our office and removed their shades, and replaced their normal bulbs with 'daylight' bulbs (which we've recently started using in our ceiling and bathroom fixtures).
What are Daylight Bulbs?
A daylight bulb is mimicking the color of light from the sky, not the direct beam of the sun. These bulbs are often marketed as "full spectrum¨ or "daylight¨ bulbs but there are also bulbs not marketed as "full spectrum¨ that produce the same bluish white color appearance and perceived brightness of daylight. Many of these bulbs also do an excellent job at accurate color rendering.
I chose to shoot myself with my contacts in, because I didn't want to have to worry about my glasses causing glare, reflections, or having to additionally tweak the angles of my face, so that I didn't have a rim blocking my eye, etc.


Camera

Let's face it, the camera is the easiest part of the equation these days. If you don't have one with decent resolution, one of your coworkers probably has one in their pocket. I used a digital camera with an auto-timer for both of my shots, but, if you want to try using your iPhone, there are apps like TimerCam that can help.
You'll be taking photos at the largest resolution possible for your device, and cropping & shrinking it down later to fit the size requirements of whatever you'll use it for.

Angles

If you have someone take your photo for you, rather than using a timer and a tripod, try to use someone taller than you, or adjust the angles in other ways. The photo should be taken from slightly above you for the most flattering angle. Have them stand on a step stool or you can sit/kneel, as appropriate.

Position your body at about a 30 degree angle, then turn your head toward the camera. The shoulder closest to the camera should come down a little and you're leaning slightly toward the lens.
Your best bet for a good headshot is using what they call a 3/4 view for your face. While you don't want to be squarely facing the camera, you do need to be looking at it.
What is a 3/4 View? 
3/4 view is where your subject turns their face just slightly in one direction until you cannot see the far ear any more.
Tripod

I do have a full-sized tripod, but, I did not use it for my headshot. As mentioned, the camera should be higher than your head, so that you are looking up at it. In my case, I used my gorillapod, perched on some furniture, to achieve the desired angle.You could hook it around just about anything you needed to, and adjust the angle fairly precisely.

Shoot, Shoot, Shoot... and then Shoot some more

I took approximately forty photos of myself (~cringing~ I know, it was awful) before coming up with something even halfway decent. I might have taken even more to get a better image, but, alas, my husband and sons were banging on the locked door to the room every 10 minutes asking if I was finished yet.

At first I had to find the right distance for the camera, then I realized my blouse's pattern was too busy and bright and changed shirts, then I had to find the right height for a flattering angle, then I tried a few different expressions (huge smile... oh, no too much gums! small smile, with teeth, without etc).
This requires lot of experimentation and you will not get a great shot on the first try, so don't be discouraged, just keep shooting.

Post-Processing

Remember what I said about having nothing in the background? That's super easy to fix, along with cropping out the excess from the frame... just use a free program like Paint.NET.

Depending on how good your lighting was, you can also lighten or increase the contrast quite easily with Paint.net. I use the erase tool to take out the background of my photo and the autobalance feature to try to correct any bad coloring.
Now, I do have a problem with my current headshot, and I'll try to rectify it next time. If you're *really* good with photoshop or similar, you could correct it here, but, alas, I am not.

I have rosacea, so my color can be horrible at times. Especially when I'm hot, like when I've got two unshielded lightbulbs a foot from my skin for an hour. So, in my photo, I'm actually wearing three layers of foundation on my face (both tinted sunscreen and makeup) to cover up my red spots. But, as you can see, the flushing extends down my chest and makes the image look a bit weird. Next time I do a headshot, I'll apply foundation all the way down to my shirt and play around with more wardrobe choices.

My hair is pretty wavy, but, I straightened it for this photo, to make sure I could crop out the background easily (hard to do with flyaways, without making it look unnatural).

I did also pass it on to my Mom, Peggy, to see if she could help with the discoloration on my chest, but, that's a bit tough without real experience in that realm. She did, however, help me out by trying on a few different background colors for me. I thought I wanted something light, but, she also suggested this charcoal color and I ended up thinking that it looked the best out of all of the options she gave me.

These tips are borne from my own experience, if you're interested in trying this yourself, I'd encourage you to hit Google and see what other advice and tips people have provided. Oh, I've also heard that, the more painful the pose, the better it will look in the photo.

Of course, despite all I've learned about making do, next time, I might pony up and pay to have them done professionally. It is a bit of a pain, doing all of the lighting and having to change the background afterward and constantly get up to check the quality of your shots, when all of the necessary accessories and skills exist in a photographer's studio already.

2013-06-26

Your Headshot - LinkedIn DON'Ts

I initially made a headshot for use with my articles, then my blog, but, almost everyone has a LinkedIn profile these days, and everyone needs a photo there. In today's post, I'll give you some DON'Ts for professional looking photos, and on Friday I'll tell you how to make a good headshot by yourself if you're disinclined to pay someone to do it for you.
In the November 2012 homepage poll, we see that 52% of AUGI members have a LinkedIn profile, 60% use Facebook and 24% use Twitter.
73% of recruiters are checking you out online, even if you don't give them a specific link yourself. You want to ensure you're presenting a professional image when they do find you.
But, I'll just assume we're purely talking LinkedIn, serving as an online resume and a way to stay connected with colleagues, current and past (and potentially, future), though you might use your headshot across a wide variety of sites.
After spending some time on LinkedIn, here are some headshots faux pas that cause me to twitch:

DON'T use a logo or cartoon as your image, that's even worse than having no image at all. Same goes for anything goofy like sideways or upside-down images
DON'T have no image at all, it makes your profile look incomplete and feels impersonal
You're 7x more likely to have your profile viewed from search results, if you have a photo than if you do not
DON'T be a gender-bender. If you've got a gender-neutral name, having a photo with a man and a woman in your shot is probably not going to prevent sexism, it will certainly be awkward and confusing
DON'T have more than one person in your image. This isn't Facebook, no matter how proud you might be of your partner, children, best buddy or pets, a professional site is not the place to show them off. This profile is about *you*, not your spouse, keep that in mind and don't mention them anywhere
DON'T get sloppy on your crop job. The photo is of you and your best bud and you just crop him out, but, we can still see his shoulder. Take a couple of minutes to use a real image editing program to remove any trace of other people
DON'T use a really old profile image. I like gray hair on the fellas, but, I roll my eyes every time I see your headshot from back when your hair was a different color
DON'T use something sexy. I cannot believe I actually have to say this, but, guys... keep your shirts on! And, of course, ladies, come-hither duckface looks are for your OKCupid profile, but not for your resume.
If you want some examples of things to DO, check out some of the images of your favorite authors or LinkedIn connections. Before doing my last headshot, I looked closely at a few respected writers in the industry to see how they presented themselves and tried to emulate their poses and styles
DON'T have a busy background. You need a plain background so that you are clearly the focus. Again, this isn't a family photo album or Facebook, the background should be either a solid color, or a simple stage (like a desk or bookshelf, no trees or anything with a lot of detail... not that you have to shoot in front of a blank wall, just that the final image should not contain them)
DON'T have a panorama, even if it's a blue sky or a white mountain. The focus should be on your face... not a miniscule pixel that vaguely resembles a human
DON'T ignore the aspect ratio. Sizes should be changed by cropping or scaling, not by freehand resizing
DON'T brag on your hobbies. Do you like cars and traveling and sports? That's nice, but, bring it up after you're hired. I think more exotic images or expensive toys could potentially make an employer feel like you are out of their price range or more interested in playing than working
DON'T dress too casually or display logos on your clothing or wear hats, flashy jewelry or sunglasses (or too formal... men *might* be able to get away with using a tux shot, if it's done right, but, no wedding dresses or evening gowns, ladies)

DON'T make it look like a mugshot. Okay! having a straight-on shot under fluorescent office lighting in an unflattering color isn't the *worst* thing you can do, but, I assure you, you can do better. Throw in some angles and use decent light to make a big difference

I'll cover how to do headshots solo, and on the cheap, in my next post.

2013-06-24

Dork Side Tips: Very Valuable Variables & Commands


Well, this wraps up my recap of the Tips from the Dork Side, and the extra tips and commentary slipped within, I hope something has proven useful.


Very Valuable Variables                                                                          

I wish this were a fictional account, but, true story, I once saw someone asking a question on a social media network about how to bring back their missing File Open/Select File dialog. The reply was “That stupid thing happens all the time, you have to reinstall AutoCAD.” Imagine my look of horror. I couldn’t post “Just type FILEDIA!” fast enough. 
(This system variable can be changed by a crash, or by running a routine that suppresses the dialog but fails to turn it back on at the end.)

AutoCAD allows so many things to be controlled by System Variables, and it is hard to learn or recall more than a handful of them. I encourage you to poke around the help files and see what some of them do (start with the below list). 
And, if you’re experiencing weird behavior, just post your question in the AUGI forums, where you’ll get much better advice from experienced peers about the cause and solution than the poor guy mentioned above.

Have you tried…?

Here are some system variables you can look up and experiment with:


HPGAPTOL
IMAGEFRAME
MAXSORT
MTJIGSTRING
PEDITACCEPT
PUBLISHCOLLATE
UCSFOLLOW
VISRETAIN
XREFTYPE


And, if you have not used any of the commands in the below list, give them a try:


AECTOACAD
APPLOAD
ARRAY
DIMSPACE
FLATSHOT
LAYERSTATE
LAYMRG
MLEADER
PASTESPEC
RECOVERALL
RENAME
SETBYLAYER
SSM
TABLE
XLIST


I hope I have shown you something you hadn’t seen yet. If you have some favorite commands and methods of your own, please stop by the AutoCAD Tips and Tricks forum to share.

2013-06-21

Dork Side Tips: Keyboard Navigation


Flight of the Keyboard Navigator

If you are old-school like me, you might always keep one hand on the keyboard. I habitually keep a few programs and many drawings open and like to navigate using typed commands:

Use Alt + Tab to toggle between open files and programs
Use Ctrl + Tab to toggle between different open AutoCAD files
Use Ctrl + PgUp & PgDn to toggle between layouts / modelspace – Page Down to move right, Page Up to move left
Use Ctrl + R to cycle through viewports


Using the keyboard when Coding VB.net

The above tip reminded me of something from my programming classes back in college. We used Visual Studio, but, none of the instructors directly covered the various ways to progress after making your autocomplete options. I noticed that all of them chose one method and used it over and over, rather than switching between them, which I found to be more efficient. When you're typing out a bunch of code, you don't want to move your hand off the keys to click an option with your mouse or the arrow keys or hit an unnecessary space if one could be added for you automatically.

When using Intellisense (like AutoCAD's command complete feature), you type a couple of letters, and objects/commands/variables etc pop up.
  • Pressing SPACE will fill in the selected item and insert a space after it. 
  • And, of course, hitting ENTER will fill in the selected item, and move your cursor to the next line. 
  • Obviously, you don't want a space after every single component of your code, so, hitting TAB will fill in the selected item, and keep your cursor at the end of it, so that you may continue typing.

 You can also toggle between the Intellisense tabs (Common and All), using the keyboard ALT< and ALT> (not that you need it with the simple example given in my code, but, trust me, it can come in handy).

I haven't spent enough time programming to have picked up any other keyboard navigation tips in Visual Studio. But, if you've got some additional to share, I'd love to learn them, too.