FormIt360 + Dynamo: A Win-Win for Designers!
Article by Ryan Baker Cameron, AIA, LEED AP, EDAC, NCARB
@rbcameron1 ryan@ryanbakercameron.com LinkedIN
Tell me if you’ve heard this scenario before... You have your design team cranking away on some concept models in Sketchup. They model the heck out of it and it looks awesome! You get client approval and final sign-off because they love it too! Congrats, go buy yourself something nice!
Then BANG, at some point it has to be real. Model conversion happens and starts to break down the files and the dreaded omissions start to happen because you’re viewing a model you have no direct connection to. You’re spending hours remodeling areas in Revit, dreaming of a better way.
Yet another hole in the BIM process.
Around 2012 Autodesk FormIt360 came on the scene. Without hesitation, I downloaded it on my Nvidia tablet because I was looking for a way to model-on-the-go myself by developing Android Apps. From a practical standpoint it was a winning situation.
Traveling a lot, I found I could save them to the cloud when I had WiFi, then get on a plane and continue. The second “win” came when it was clear to me that all that work wasn’t wasted because it could be transferred directly to a Revit model using massing families. This meant that my efforts in the Revit process were much more accurate depictions of the model, not a comparison between two screens. One step better, I could apply my “real” Revit walls to the face of the massing geometry.
Since those days, FormIt360 has come a long way. Animations, layers, materials and even Dynamo integration.
So let’s talk about that for a moment. The ability to write code and run a script to help evaluate your model isn’t just a neat trick, it is becoming a requirement. Coding is the new sketching.
Let me explain. Let’s say you have a zoning ordinance that requires setbacks and has height restrictions. It isn’t always evident to your design team, as we want them to have the freedom to be creative within the boundaries of the site. What if you could create a simple script that turned the model red, or warned your design team in some way, should they go outside those legal parameters?
Perhaps a script that auto-adjusted a parking garage by typing in simple numbers for Stall Count or Floor-to-Floor height? https://dynamo.autodesk.com/customize-5793c57a1cea5a924f4682fb
Feel free to login and download this Dynamo Studio file to experiment with. Maybe you could be the one to make it even better? That’s the beauty of open-source, take it and make it better.
So where’s the beef? Why would you want to migrate from Sketchup, since you have all of those models in your library?
Well for starters, FormIt360 has a plugin for Revit that converts *.rfa and also *.skp file types into *.axm files for use in Formit360. Secondly, you’re going to start to see more websites with free content available for download as FormIt360 becomes more popular like this from Turbosquid: http://www.turbosquid.com/Search/Artists/3d-medical-equipment?keyword=axm
Well for starters, FormIt360 has a plugin for Revit that converts *.rfa and also *.skp file types into *.axm files for use in Formit360. Secondly, you’re going to start to see more websites with free content available for download as FormIt360 becomes more popular like this from Turbosquid: http://www.turbosquid.com/Search/Artists/3d-medical-equipment?keyword=axm
Twitter link: https://twitter.com/rbcameron1/status/446347949195272192LinkedIN links: https://www.linkedin.com/pulse/coding-new-sketching-ryan-b-cameron-aia?trk=hp-feed-article-title-publishNvidia link: https://blogs.nvidia.com/blog/2015/02/12/architects-directstylus/Free models: http://www.turbosquid.com/Search/Artists/3d-medical-equipment?keyword=&include_artist=3D+Medical+Equipment&sort_column=A5&sort_order=ascRevit/Sketchup Converter: http://formit360.autodesk.com/page/formit-360-revit
In this demonstration I will use the 2017-UR2 version of Dynamo Studio. Do not let the thought of having to learn scripting become overwhelming. We will be tip-toeing around Dynamo’s most basic nodes and publishing them to the cloud using its upload manager to Google Chrome. Plus, you’ve already downloaded the script from the dynamoreach link I posted, right?


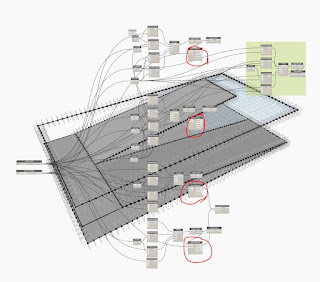
Remember when I said we’ll be using the most basic nodes? Of course you do, it was in the previous paragraph. Do you notice all the black dots with reference planes attached to them in the image below? That is the Curves.DivideCurve node in the Lunchbox package created by a college classmate of mine, Nate Miller of Proving Ground. The web version can’t recognize it (for now) so we’re going to detach it from the lines of code.
That way you don’t get an error like this:
So your screen will look like this then once all the black dots are gone. In fact, this is what you should have downloaded already.
Step 1:
Know your nodes! We will only be using: Point.ByCoordinates List.Create Polygon.ByPoints Surface.ByPatch Integer Slider Custom Code Block
Step 2:
Right-click in the canvas to bring up the search menu. Type in the names of the nodes above and place them on the canvas. To create a Custom Code Block, just double click the canvas.
Step 3:
I hope you’re Italian, because its spaghetti time! Connect up your Point.ByCoordinates node X to the Integer Slider. Now slide that toggle bar left and right! You are officially a coder!
Step 4:
Duplicate the rest of the code from the file you downloaded to get a feel for what it’s like to string these nodes together. It’s the best way to get comfortable, a simple set of shape-generating nodes together to reverse engineer what someone else has put together. Especially when the answers are right in front of you. Just like how you made it through college, right?
Here are a few hints: Holding the Esc key will temporarily shift you from code mode to model mode.
Ctrl+B will do the same. Just like most things in computer programs, you can CTRL+C and CTRL+V your nodes so you aren’t constantly right-clicking and searching for nodes to place. Trust me, it’s faster.
Ctrl+B will do the same. Just like most things in computer programs, you can CTRL+C and CTRL+V your nodes so you aren’t constantly right-clicking and searching for nodes to place. Trust me, it’s faster.
Step 5:
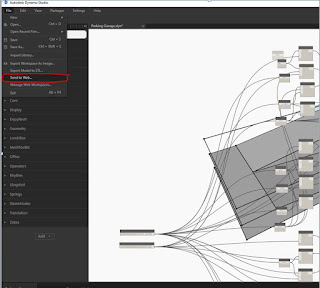
Upload to web! This is the easiest step of them all! File & Save to Web & Name it and hit Publish! Amazing right? And you can just copy the link and share it!


Just like learning to drive, I can tell you all about the engine, the types of tires and when to shift, but the only real way to experience it is to get behind the wheel and go.
Enjoy the ride everyone!


No comments:
Post a Comment